Supplies
- Tempered Hardboard or some type of board as your base
- Picture printed on nice quality paper. I suggest getting done at a photo or copy place.
- Spray Glue
- Screws
- Drill
- Clock kit
- Clock template for designing onto your picture before you print
- Picture hanging hooks
- Paint. You can spray paint but that can be runny.
- Paint brush. I went with sponge brush because it leaves less streaks.
- Saw. Unless you get it cut at the store. We have a saw so we did it at home.
- Scissors
- Optional: Wood block pieces
First step. You bamboozle the groom to sending the good version of the photo you were inspired by. Then you use whatever program you want to edit the photo adding the clock and name info. I used powerpoint because it was what I had on hand at the time. I found a clock template online with a simple google search. Created a circle shape over it. Found the font of numbers I wanted. Lined those up along with the template to make sure everything matched. Played with coloring so the clock dial stuff would show. This one is a grey. My friend Jason helped me with the last name having a shadow because I could not do it on powerpoint. I google served clock template for you. Check them out here Clock Template

Once all the design was done I sent it to the printers. I made two copies. I knew I would mess it up. I already had enough board at home from a previous jewelry display project so if I messed up I was okay. I sent this to kinkos. I wanted the clock to be a good size so I needed to make a poster size version of the image. Plus I knew the paper they would use would be thicker. I believe I was going for 12×12. Yeah yeah I forget the measurements. It was a long time ago. Whoops.
You can see in the below picture the paper is a bit rolled. They roll it at kinkos. had to do a few days of flattening before I started.
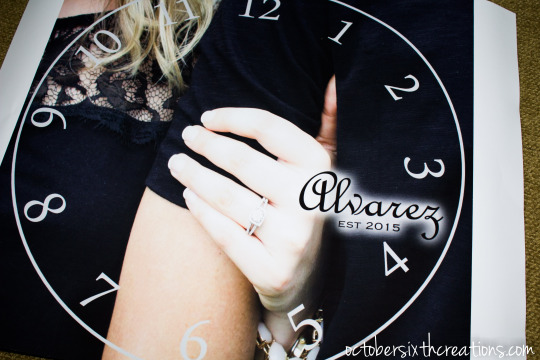
I used my heavy craft mat to flatten. It worked. Cut out photo once you are ready.

While things were getting flattened. We worked on the board portion. Steve added the screws and wood blocks to the back. We thought the design would look best with the wood blocks resting on the wall to hang instead of just the board with the picture. Makes it a bit more stable. We added hanging hooks to the blocks after all the painting, gluing, and sealing.


I painted the board front so the picture has a frame look of sorts. Did not paint the back and wood blocks because I hate if paint somehow stains a house wall. This picture is grey. The first version I used black and did not like it. Like I mentioned, design leaves an edge around the photo that you paint. I guess you could make the photo the whole board. For gluing it is easier this way. I also liked the edge. I feel like it gives the person who is getting the gift the ability to add molding or framing around the edge if they want to. I had to do about 6 coats to get the paint the way I wanted it.

Once you have everything painted and glued to your liking. You put the clock kit on.


